
Quick answer
Use the Files section on your Tilt account to upload, view, download, or delete general documents. The Files section in Tilt is for extra uploads on your account — for specific documents your Leave Specialist has requested during a leave (like a medical certification or proof of bonding), use the Documents section of your leave plan instead.
Who this applies to / Prerequisites
- You have an active Tilt account.
- You have files uploaded to your Tilt account, or you need to upload a new one.
Steps
Navigate to the Files page:
- Log into Tilt.
- Click Files in the top navigation. The Files page shows all the documents you've uploaded to your account.

Understand what's on the Files page:
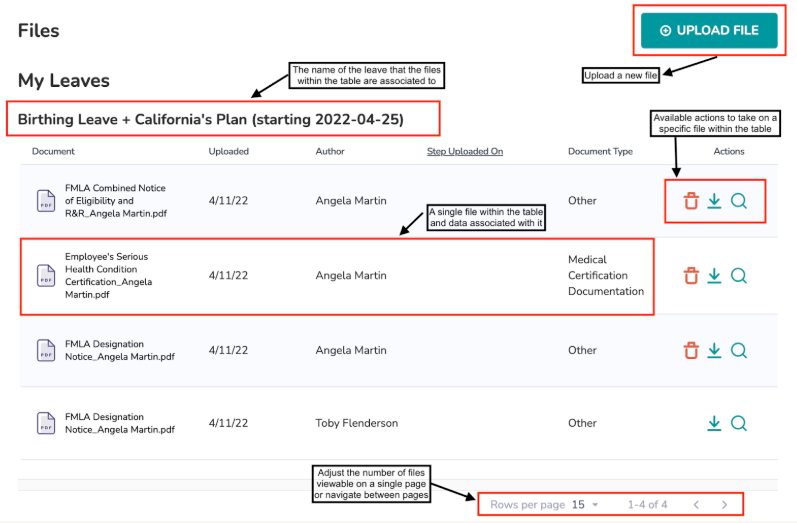
Each file entry shows:
- The leave plan the file is associated with (grouped by leave)
- The date the file was uploaded
- Which user uploaded the file
- The document type
- Action icons for delete, download, and quick view
Upload a new file:
- Click UPLOAD FILE in the top right of the Files page.
- Select the file from your device and confirm the upload.
View a file (quick view):
- Find the file in the table.
- Click the magnifying glass icon in the Actions column.
- A pop-up opens showing the file.
- For multi-page documents, use the left and right arrows on either side of the page to navigate between pages.
- Click the X in the top right to close the pop-up.
Download a file:
- Find the file in the table.
- Click the download icon (down arrow) in the Actions column. The file downloads to your device.
Delete a file:
- Find the file in the table.
- Click the trash icon in the Actions column.
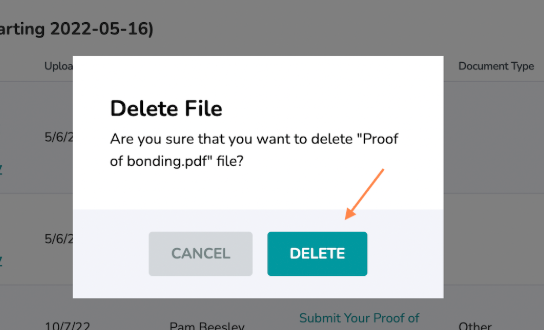
- A Delete File confirmation pop-up appears asking, "Are you sure that you want to delete [filename]?"
- Click DELETE to permanently delete the file, or CANCEL to keep it.
What if it doesn't work
- If you don't see a delete icon for a file, you can't delete that file. You can only delete files you personally uploaded. Files uploaded by other users must be deleted by them.
- If you're trying to upload a specific document Tilt has requested for your leave (like a medical certification, proof of bonding, or FMLA form), don't use Files — those go through your leave plan's Documents section instead.
- If you can't find the Files page in your top navigation, confirm you're logged into your Tilt account. The Files section is available to all active users.
Limits and exceptions
- Files vs. Documents: Files is for general, non-specific uploads (anything you want to store in your Tilt account related to your leave). The Documents tab in your leave plan is for uploading specific files Tilt has requested during your leave plan — like FMLA certifications, medical documentation, or proof of bonding. Use the right one for the right purpose, so your Leave Specialist can find what they need.
- Deletion is permanent. Once you confirm a delete, the file is removed from your Tilt account and cannot be recovered.
- You can only delete files you personally uploaded. Files uploaded by HR users or other employees are managed by them.
- Multi-page documents: the quick view pop-up supports paging through multi-page files. If you need to save or print a full multi-page document, download it as a PDF instead.
Related questions
- Upload and Manage your Leave Documents (the Documents tab in your plan, for specific requested files)
- Navigating Your Leave Plan
- View and Manage Employee Leave Documentation (HR-facing)